Self-tape auditions have been discussed at length in the TV/Film world. In working with my voice students and fellow singers, however, I am not sure the importance of a good self-tape setup has been adequately explained in the singers’ world. Let me see if I can help clarify why self-tape auditions are so important.
- It’s become “standard” to self-tape at home. Studios are closed (and some are not re-opening. Shetler Studios and Chelsea Studios, New York City staples have permanently closed). Furthermore, it’s likely that self-tape auditions will continue even after COVID closures have lessened. I am hearing from more and more industry professionals that the first round of auditions will almost indefinitely be via self-tapes.
- Currently, it’s the best (and only) audition option we’ve got. A number of theaters and ALL film/TV auditions are via self-tape right now.
- Singers can share current work on social media, submit to agents/managers and upcoming projects via self-tapes.
However, if you are going to compete, your self-tape needs to be professional, clean, and put you in the best light. (pun intended!) Most actors have full self-tape studios in their apartments right now! And yes, a self-tape won’t be the sole reason you book a job, but it could prevent you from booking a job if the quality is below industry standards.
Add your video to your free CS Music Profile and be seen by hundreds of schools, agents, managers, and more! Click here.
Evaluate your space and see what you have available right now. It doesn’t and shouldn’t cost you an arm and leg.
 Here are some tips to remember when setting up your self-tape studio and shooting:
Lighting
- Have good lighting!
- Don’t light from behind you. Natural light from a window in front of you is great.
- Overhead household lighting should be avoided as it may cast shadows on your face.
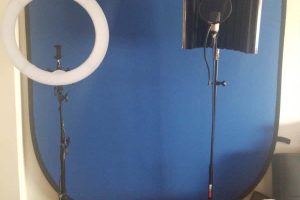
- I love a Ring light or a more affordable set up that provides depth.
Sound
- Use a Microphone: a lavalier mic or an awesome compressor mic depending on your needs.
- Plug your microphone into your recording device
- If you don’t have a microphone, make sure you are close enough that the recording device picks up your voice clearly. Do a test!
- If singing to a track, play any backing track through a separate speaker. I use a portable blue tooth speaker.
- Try to shoot in a “dead room”, with carpets, curtains, upholstered furniture, to eliminate reverb and acoustics
Orientation and Backdrop
- Use a backdrop or a painted solid wall (greys and blues work best)
- My Backdrop: I use a dark grey and love it.
- Shoot the clip horizontally! This is a non-negotiable. Vertical clips just don’t work and aren’t accepted.
- Try looking an inch or so to the right or left of the camera. I put a sticker on my computer for that. Or you can have a “reader” aka: another person stand directly next to the camera (phone) so you have something to look at. Sightlines are important!
- Use a tripod or stand. A music stand also works! The camera should be at EYE level. This is really important. You don’t want to be looking down or up at the camera.
Shooting and Editing
- You can shoot on your computer or iPhone. I use both. When using my laptop, I use Photo Booth on my Mac. It’s the free application that comes with the computer.
- Edit your clip, so that it starts and ends correctly with no lag time.
- Compress the file. See notes below, but avoid sending HUGE files.
- Avoid showing family members in the frame
- Avoid personal items in the frame
- Reshoot if your first attempt doesn’t work or gets interrupted. Don’t settle for a poor video with visual or audio distractions.
- In your iPhone Settings, under Camera, select “4K at 30fps”. (Or “1080p HD at 30fps” if you don’t see a 4K option.)
- On iPhone, in same menu under “Formats”, select “Most Compatible”, not “High Efficiency”
NEXT STEPS: Editing and uploading!
Once you have your video file on your iPhone or laptop, sending and editing the file can be tricky!
Here is my step-by-step process:
- From iPhone
- Edit the clip using the editor in the video file in “Photos”. Make sure you trim the clip to be concise.
- If I need to add a title page, edit multiple clips together, add transitions or any other details, I airdrop the file to my Mac and use iMovie
Important: You should have very basic knowledge of how to edit, add transitions, and title pages in iMovie or some other editing software. It’s not difficult and will save you tons of money and time! - If I do not need to add any transitions, title pages or edits, I will usually upload the file directly from my iPhone. The file is already condensed this way! It is much faster to upload to YouTube, Actors Access, WeTransfer, or other online sites from your iPhone.
TIP: If I am sending the video to my agent/manager or submitting for an audition, I use WeTransfer. (I love it because it tells you when the recipient has opened your file.)
-From MacBook Air
- If I am shooting from Photo Booth, I will edit the clip in Photo Booth.
- Airdrop from Photo Booth to my iPhone. Move on step 3 for “From iPhone” above.
- If I need fancier edits (transitions, title page or cropping), I import the file into iMovie.
- Make edits in iMovie
- In iMovie, you can export the file to YouTube, Vimeo (etc) or as a file. I usually export as a file and then upload to the audition site (Actors Access or Backstage). I export the file at 720p and make sure it’s under 250 MB. Most sites have a maximum file size of 500 MB. Even larger than 100 MB can be problematic. You can choose these settings in iMovie when you export.

- MP4 Files work better than MOV files. You can find free convertors online: https://www.zamzar.com/convert/mov-to-mp4/
Here is my self-tape kit. There are a million other options, but these are some standards that have worked for me.
And there you have it! These are by no means the only way to set up your studio or edit and record your videos. Find the ways that best work for you and get familiar with your set-up and software, so you don’t go into panic mode when you get a last minute audition.
Keep singing, creating work and being visible.
Can’t wait to see what you create!
I believe in you,
Minda
